We’ve shared a few different quilting designs you can create with your walking foot and this week we are sharing some that use curves! Often when we think about walking foot quilting we assume it’s all going to be straight lines, but that isn’t the case. There are some curved designs that you can easily create with your walking foot to add a little something extra to the final quilt and expand your library of options.
Marking the Quilt
For the first design, we just used small circular objects around the house. Depending on the size of your blocks, grab bowls, cups, or thread spools. With walking foot quilting, keep in mind it’s going to be tricky to do super tiny circles, so go for gentler medium to large curves when starting and as you get more comfortable, you can try smaller curves. Also, when using a marking tool, always test it first! Don’t draw all over your quilt top until you know it will come out.
Quilting Path
I love quilting paths that allow me to make rows across the quilt, especially when using my walking foot. The straighter the path, the easier it is to maneuver on a domestic sewing machine. For these designs, I’m going to show you a couple ways you can approach the quilting path so you can pick which one works best for your situation. If I need to move between spaces, I like to hide my stitches in the ditch (seams between blocks). This means less stopping, tying off thread, and burying them later.
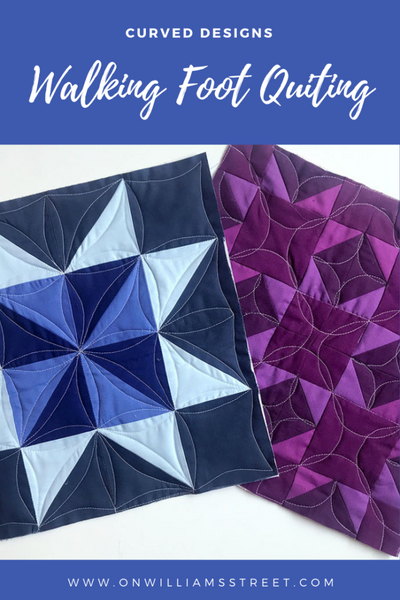
Motif 1
This motif has overlapping circles inside squares that create a nice frame or flower shape when they are all together. If you are using this design in connecting spaces, definitely use the line method to stitch across the quilt. If the blocks you are quilting don’t touch, don’t worry. You can still easily quilt out this motif in one motion and fill in the space, then move to the next one, it just takes a little more spinning the quilt around.
I like to start quilting in the middle and work my way towards the end. If I was quilting a large quilt on my domestic machine, I would likely start at the top, stitch to the bottom, break thread, and go back to the top. This means that I’ll only ever have 1/2 the quilt under my needle, and the more I quilt, the less fabric I’ll be dealing with inside the throat of the sewing machine. After I’ve finished the first half, flip it around and do the same for the opposite side. Just make sure you have basted the quilt well and go slow to prevent moving the fabric as much as possible. You can also increase you stitch length a little. This helps if you find that the fabric isn’t moving very freely under the needle. Also, set up on the largest surface you can so that you can support the weight of the fabric on the table top.


Motif 2
This motif is similar to the first, but we are going to stitch both sides of the seams and use smaller curves. Since the curves are smaller, it’s much easier to do without marking. Just gently curve out, then gently curve back in aiming for the corner. Then, move on to the next block. After you get to the end of the seam, turn it around and stitch the opposite side. I like to do this around all the main seams in the quilt. If you have seams in the background and don’t want them to stand out, you can skip them entirely. Don’t stress if your curve isn’t perfect. The more you quilt, the better you’ll get. After you have washed your quilt, small imperfections will hide more and be much less noticeable.

Walking feet aren’t just for straight lines! Look at other walking foot quilting designs you like and see how you can add subtle curves to them to create entirely new options for your next quilt top.