Only 2 more blocks and we will be finishing up this years quilt!
Looking for previous months? Check out the main quilt along page for links to all the blocks and instructions.
2023 Quilt Along - Quilt as You Go
Preparing the Block
Before we can quilt, we need to prepare the block. If you want to see this, head to Month 1, we show you how in that video. Grab one of your 19" background squares and 1 - 19" batting square. If you want to spray baste them, spray the backing square and carefully lay the batting on top of it. If you are pin basting, you don't need to worry about this.
Next, fold the backing and batting in half on the diagonal and press it. This will help us line up the quilt block in the middle. Press it again on the opposite diagonal and press again.
Now that you have an X across your block, spray (if using spray) the back of your quilt block, then gently lay it down, lining up all the corners on your X. I find that folding it in half makes this easier so it's not sticking to everything.
If you are pin basting, after lining up your block, go ahead and put a few pins in. You might not need as many as a full sized quilt, but it's good to keep everything in place.
If you have a specific layout, quilt the blocks following the order below. We'll be trimming outside edges differently when joining the blocks to allow us to add the borders.

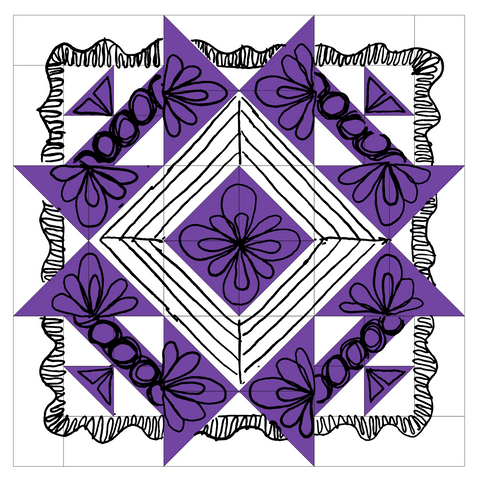
The Quilting Plan
We are going to start our quilting plan in the center block and work our way out. This keeps everything in place and if things shift, they are shifting out and not creating extra backing fabric we have to deal with. Remember, don't do anything with the extra backing and batting yet, that will be used to join the blocks.
If you want to print out the quilting plan, click on the photo below and it will pull up a bigger version.
If you want to create your own quilting plan, click on the blank photo and you can print out the block and sketch your own designs.

If you are new to free motion quilting, I recommend printing out the blank block and practice drawing the designs, moving as if you were quilting the block. This is great practice, creates muscle memory, and helps you figure out how to move around without the stress of ruining the quilt block.
Setting up your Sewing Machine for Free Motion Quilting
Now we need to set up our sewing machines. A couple of general tips:
- Put on your free motion quilting foot. This will let us move around the quilt block in any direction.
- Lower your feed dogs. If you can't lower your feed dogs, try setting your stitch length to zero. That way they won't move.
- Create as much flat space as possible. If you have an extension table or can set it level in your sewing table, this helps.
- Put your needle to stop in the down position.
If you have quilting gloves and want to use them, grab them! They can really help with moving your quilt around the machine.
Quilting the Block
Now we are ready to start quilting. We'll complete the plan as follows:
- Start this block in the very center. Make the bigger petals around each of the seams in the center square, then add a smaller petal inside each one. Now go back and add in the smaller petals in between.
- Break thread and move to the outside corner of the center square. Quilt a line from this corner to the corner of the outer white square and then trace your quilting line back to about 1/4" from the center square.
- Quilt a straight line about 1/4" from the center square to the next corner. Quilt another line to the outer corner of the white square and back, repeating this step until you get back to the start. Move along the line and quilt two more squares in the white square border, then 2nd in the middle and the 3rd about 1/4" from the opposite edge.
- Use the seams to quilt to the middle of the large corner triangle. Quilt a large petal over the middle seam and put a smaller petal inside it.
- Quilt two smaller petals on each side of the large petal, filling the large triangle.
- Quilt circles inside the connecting bar, going around each circle 3-4 times.
- Repeat steps 4-5 for the opposite large triangle.
- Move along the top of the connecting bar and put two smaller triangles echoed inside the small triangle. Continue along the top of the connecting bar and follow the seams to the outside edges. Staying within 1/8" of the outside edge, quilt along the edge to the next corner unit. Repeat steps 4-8 until all four corner units are done.
- For the border motif, quilt along the seams until you get to the marked line in the outer white triangle. Stitch this seam, then halfway between this seam and the edge, quilt a gentle curved line.
- In between these lines, quilt close back and forth lines. Move along the seams to the corner. Quilt a line just on top of the seam line and a gentle curving line halfway between the first line and the edge. Fill with close back and forth lines. Repeat steps 9-10 to complete the border around the quilt.
When quilting, remember to stop at the edge of the quilt block. Don't stitch into the extra batting and backing, we'll need these free for when we join the blocks.
Free Motion Quilting Tips
If you are new to free motion quilting, there are a couple tips that might help.
- If you are having trouble moving the block around, try stitching a little faster. This will also help smooth out curves. It seems crazy, but works. I promise.
- Doodle the design first. If you are comfortable doodling the pattern, you'll feel more comfortable stitching it.
- Sit up straight. Try not to hunch over your machine. You'll just end up causing unnecessary muscle strain and pain.
- Try different hand positions and holds till you find one that feels comfortable for you.
- Practice, practice, practice. Just like anything, you can't get better if you don't quilt! Be gracious with yourself and allow the opportunity to improve. No one looks at your quilting as closely as you do, so don't judge too harshly!
- Have fun! If it's not fun, why are we doing it?
If you have any questions, please let us know!
Happy Quilting
Kimie and Missy
