We are back for more quilting ideas! You may be wondering if I’m running out of different ways to quilt blocks, but I can assure you, that will never happen.
You may have started to notice that for the most part, I use a core base of quilting ideas for most of my designs, but there are so many different ways to combine them and create an endless list of ideas. I’m hoping this is encouraging to you, especially if you are new to free motion quilting. You don’t have to master everything to be good at it, just master a solid basic set of quilting motifs then mix them up and change them to fit the space. After you’ve done this, you can work on adding in more variety and learning new things as you go.
Quilting Design 1
In this first quilting design, I stayed within the pieced shapes. The things I’m looking for when creating a design is contrast and finding ways to create foreground and background elements. The motif in the yellow triangles connects them and makes it seem as if the yellow square is behind the gray square. I used the lines in opposing directions to create contrast in the quilt block and really set off those green areas as two distinct spaces.
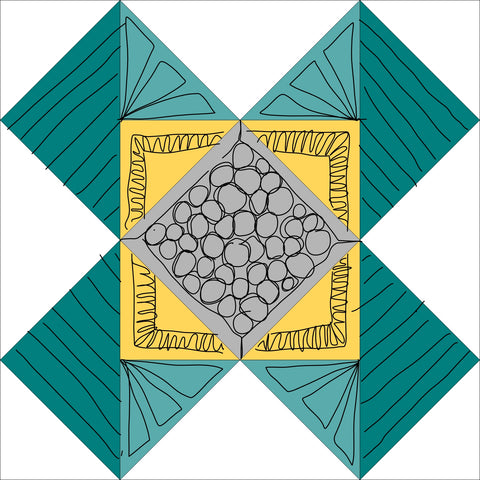
Quilting Design 2
This quilt block is done in a similar way. I used the yellow spaces as one unit to make it appear as a background element. Again, I used contrasting lines to set off the green areas and used a more eye catching quilting motif in the center gray square. The center design looks complicated, but can actually be eye balled pretty easily. If you are nervous about eyeballing it, use a marking pen or chalk to throw in some dots for the corners of the shapes and then just connect the dots for the quilting.

Quilting Design 3
This quilting design starts to bring in some new elements. I softened up the space by adding in feathers and treated the yellow/light green areas as on shape instead of quilting them differently. The straight lines next to the feathers adds lots of contrast. The triangles in the middle start to frame out the green/yellow spaces and could even be repeated in the white areas around the block design to really set off that framed look.

Quilting Design 4
This block might be my favorite quilting design out of all of them. In this motif I worry less about the individual shapes and start to pick out bigger areas. I did a soft arch around the outside of the squares and then filled in every other one with back and forth lines. By doing a double arch along each edge in the middle, but leaving negative space, it really creates a strong contrast and two distinct areas. Even though they aren’t perfect circles, they are going to read as that and pop and stand out in the final quilt. If I was using this quilting design on a top made entirely of this block, I would eliminate any sashing to the spaces meet right together and create an overall pattern of the opposing spaces.

Full Quilt Quilting Design 1
The main thing I want to show on the overall quilt design, is different ways you can break down the space. In this quilting plan, I used many of the same elements we used in the previous blocks, but then focused on how I can break down the white areas. By creating foreground squares and background squares, it makes it very easy to fill in the areas as you move around the quilt. I chose two very different quilting designs, a curved pebble and the straight lines, so they definitely read as two distinct areas. If you are dividing space like this, you want the quilting motifs to be set apart and not meld into each other.

Full Quilt Quilting Design 2
In this plan, I used repetition to create a checkerboard with the quilting design. By repeating the same motifs in different areas, it makes it cohesive across the top and is easier to create, because you have less motifs to put together! This design doesn’t worry about the block itself so much, and finds new and different ways to break up the space. I do want to point out, when looking at these plans, it might seem overwhelming as I’m using black lines, but when you quilt this with thread, it won’t stand out as much and will work to add texture and interest without overpowering the piecing.

If you want to print out your own blocks to sketch on, click on the blank blocks below. Don’t be afraid to try new things, when using a pencil and paper, you can’t mess up! It’s always fun to sit down and see how many different quilting plans I can come up with for the same space and I challenge you to do the same.


