Dresden blocks are a classic! They have been around forever, but can still look modern and updated. I just love it when we can incorporate traditional blocks into modern quilts. This week, I’m showing a bunch of different ways you can quilt this fun block. I really wanted to make sure to show off the unique shape of the block with the quilting motifs I picked.
Quilting Motif 1
This motif keeps things simple by alternating two different designs. I opted to put a little spike on the top of the swirls to really make that shape stand out. You could also do the same design in all of the dresden plates if you prefer. I chose a simple straight line motif in the alternating spaces to add contrast to the quilting plan.

Quilting Motif 2
For this quilting plan, I chose to treat the entire dresden as one shape, ignoring the different colors. Again, to make sure that the points and shape of the dresden stood out, I echoed around the entire shape. A few more different sets of echoes to fill in the inside continues that accent of the block. You could leave those spaces empty if you prefer less quilting, or do a dense fill in alternating areas to give more dimension to the final quilt.

Quilting Motif 3
For this quilting design, I treated each plate individually again. Since we have 4 different colors in our design, I chose 4 different quilting motifs and used the same one in each color. When picking which quilting designs to use, I focused on using designs that had alternating directions and contrasting elements, like the straight and curved lines. This helps those designs to stand apart from one another and again, adds interest to the quilt.

Full Quilt Design 1
This design would work really well with any of the previous block designs. A simple outline of the dresden is going to give it a frame and make it stand out. Then I opted to fill in all the background with horizontal lines. These could be evenly spaced, or alternate the spacing for a more casual look. This design really keeps the focus on the dresdens themselves.

Full Quilt Design 2
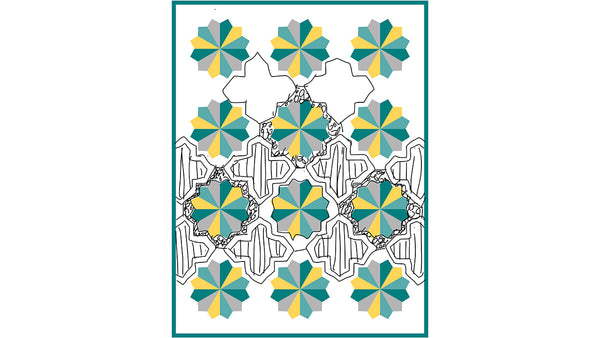
This quilting plan starts by pulling out shapes in the negative space. I really like the different angles and areas in between the dresdens and chose to highlight a pointed cross. Because I want that shape to stand out and not get lost, I would echo it before adding any fills. This still left some awkward spaces around the dresdens themselves and while they could all be filled with the same background fill, I opted to create enclosed spaces and only fill every other one. Some simple straight lines work great to fill in the crosses and I would definitely quilt in the ditch around each of the dresdens to accentuate those shapes.

As always, I recommend printing out blank blocks and just playing. Don’t stress too much over the process or the final block as you try out lots of different quilting ideas to come up with something you love. It’s easy to doodle and sketch on paper to get an idea for what you want the final block to look like, so don’t hold back! Click on the blocks below to print out a picture to draw on.


We’ll be back next month with block 10 of our bee and more fun quilting ideas!


