I love star blocks. There are so many different varieties and you can use them in lots of different projects. They work great for babies and adults alike! Along with the versatility of star blocks, there are lots of different ways you can quilt them! I’m going to share 4 different quilting motifs you can use to finish your star quilts.
Quilting Motif 1
For this motif, start in the middle, swirl at the widest point in the block and then curve back into the outside point. I chose to swirl them all in the same direction to create a radial effect throughout the quilt block.

Quilting Motif 2
This quilting design also does the same design in all of the star points. Start in the middle and then echo the sides of the shape towards the center, then angle back out the the outside point. Repeat for the second side and fill with your favorite quilting design. Ribbon candies are a quick and easy way to add texture and interest.

Quilting Motif 3
With this design we are going simple. Straight lines can really accent a block as they set off the shapes that are already there. With the straight lines echoing the star shape, it creates arrows that will guide your eyes right to the star in the middle of the quilt block. This design could easily be offset with more intricate quilting in the negative space.

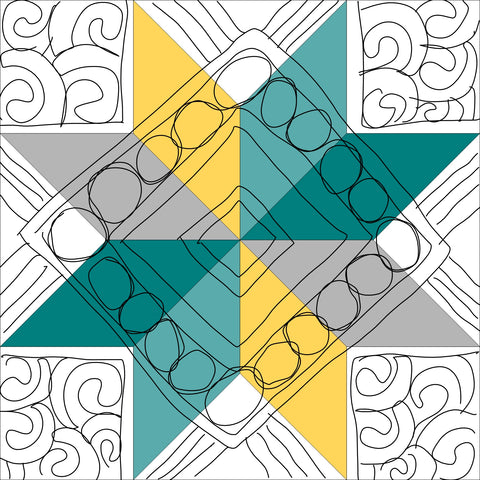
Quilting Motif 4
For this quilting design, I go outside the box and find different points I can connect together to create different shapes on top of the piecing. First I connected the points between the dark green and gray diamonds with the points between the yellow and light green diamonds. The I used the points between the gray and yellow diamonds and the dark green and light green diamonds to create a larger square. Add in some echoes and fun fills and you have an unexpected quilting design full of texture and interest.
Full Quilting Plan 1
When I look at the full quilt, I always want to break it down. The first shape that stood out to me was the squares between the star points. By marking out those shapes, it left the smaller diamonds to act as background elements in the quilting.

Full Quilting Plan 2
This final full quilting plan shows you alternative ways you can break up the space. I connected the star points to first create frames around every other star. I took advantage of the frame and used straight lines to really offset the stars and make them stand out. Some simple quilting designs in the star itself creates a nice focal point.

