This month's project features Animal Alphabet by Edward Miller. This collection seemed to be timed perfectly as I'm currently teaching my 5 year old to read! What better quilt to make then one you can snuggle up on and use to learn your letter sounds.

We received 5 different prints from the collection and the panel which includes all 26 letters and a whole bunch of cuteness. When we saw it, we knew we had to use it!
Buy the Pattern

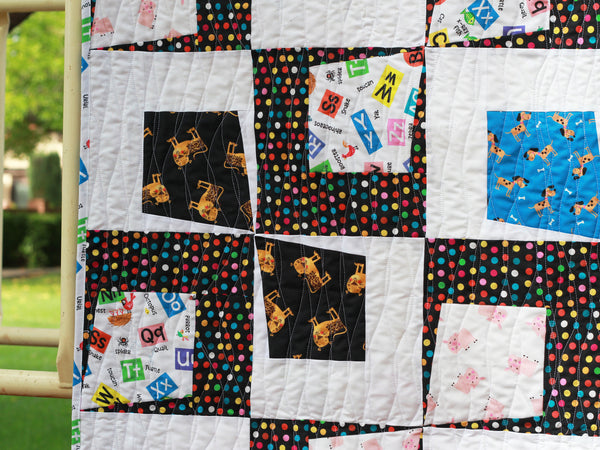
We don't use a lot of panels and we haven't ever done a two sided quilt, but this project got both. We opted for our Rough and Tumble pattern on the front (or back, whichever you prefer). This is a fun and beginner foundation paper pieced pattern that makes it easy to mix and match your favorite collection. We veered from the original fabric layout just a little and created a checkerboard effect with the background fabrics. For the prints, we paired a darker fabric on each of the white squares and a lighter fabric on each of the black polka dots. This high contrast really helps each fabric to stand out.
Buy the Pattern


Buy the Pattern
For the second side, we kept it simple. We used the black polka dots to make a nice frame and centered it on the first side, making sure to keep a symmetrical border all the way around. To line up the front, I marked the center of all four sides on the back and front. The back was larger than I needed to allow for quilting, but that is okay as long as your borders are the same width. After both sides had the all four centers marked, it was simply a matter of lining up all four marks. This process is definitely easier with a smaller quilt, but would work with a big one too. Start by lining them up in one direction, then adjust the opposite direction as needed to get it perfectly centered.

Because this quilt is two sided, I didn't want to do custom quilting that might distract from one of the sides. I felt that a fun all over design would suit this project best and make it look cohesive no matter what side baby is playing on. Wavy lines that alternate direction and cross over ever so slightly give this quilt movement and texture.

Buy the Pattern
And of course, the binding. A quilt isn't done till it's bound! We simply picked one of our favorite prints and did machine binding front and back. When attaching the binding this way, we sew it on the back first, then wrap it around the front and stitch just inside the edge of the binding. A stitch in the ditch foot with the needle moved a couple notches makes this process really easy and keeps your stitch line so perfectly even.

Want to make your own version of Rough and Tumble? Grab the pattern in our shop.
Rough and Tumble Quilt Pattern
Any questions, don't hesitate to reach out!

Happy Quilting!
Kimie and Missy
